Buick Regal: Radiator Lower Insulator Replacement
.png)
Preliminary Procedure
Radiator Replacement (2.0L LTG) or Radiator Replacement (3.6L LGX)
- Radiator Lower Insulator [2x]
RADIATOR AIR LOWER BAFFLE REPLACEMENT
Removal Procedure
1. Front Bumper Fascia - Remove.
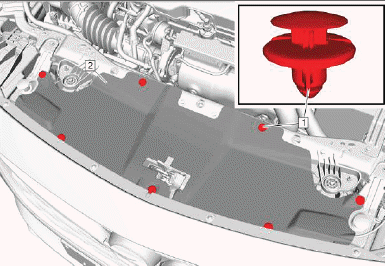
2.
.png)
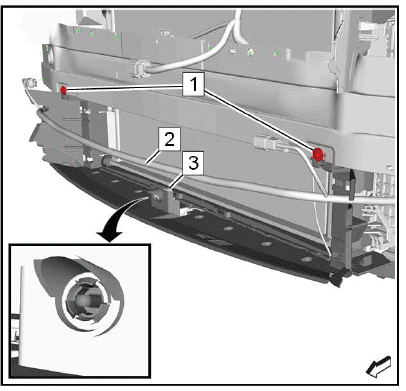
Body Wiring Harness (2) - Unclip.
3. Ambient Air Temperature Sensor (3) - Remove.
4. Radiator Air Lower Baffle Bolt (1) - Remove [2x].
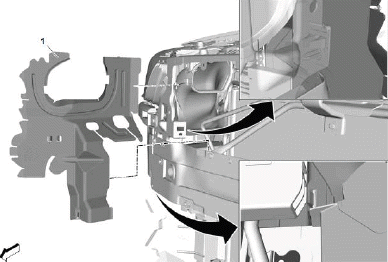
5.
.png)
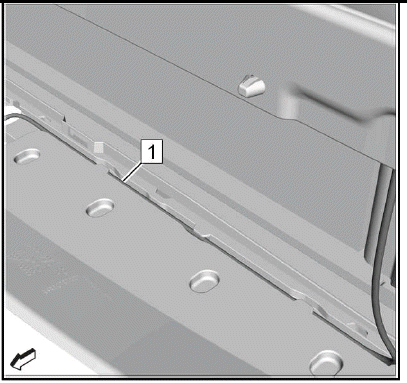
Wiring Harness (1) - Unclip.
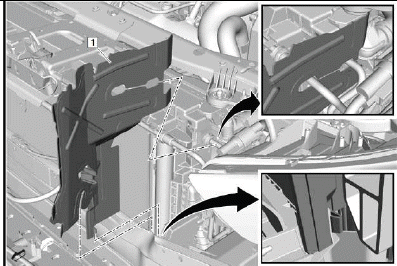
6.
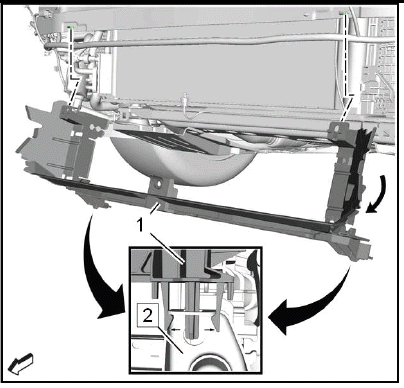
Radiator Air Lower Baffle (1) @ Radiator Lower Bracket (2) - Unclip [2x].
7. Rotate the radiator air lower baffle (1) a little bit clockwise that it is removed from radiator lower bracket and then move it downwards.
8. Radiator Air Lower Baffle (1) - Remove.
Installation Procedure
1.
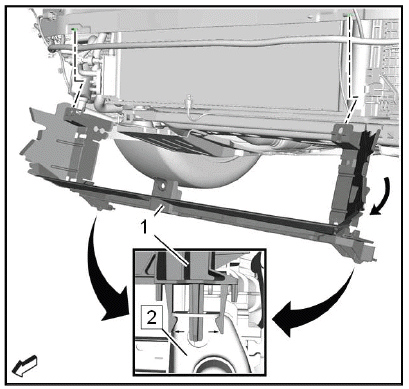
Radiator Air Lower Baffle (1) - Install.
2. Rotate the radiator air lower baffle (1) a little bit clockwise and then move it upwards to the front bumper impact bar. Then rotate it counterclockwise to install it to the radiator lower bracket.
3. Radiator Air Lower Baffle (1) @ Radiator Lower Bracket (2) - Install [2x].
4.
Wiring Harness (1) - Install.
5.
Body Wiring Harness (2) - Install.
6. Ambient Air Temperature Sensor (3) - Install.
CAUTION: Fastener Caution.
7. Radiator Air Lower Baffle Bolt (1) - Install and tighten 2.5N.m (22 lb in) [2x].
8. Front Bumper Fascia - Install.
RADIATOR AIR SIDE UPPER BAFFLE REPLACEMENT - LEFT SIDE
Preliminary Procedures
1. Remove the radiator air upper baffle.
2. Remove the front bumper fascia.
- Radiator Air Side Upper Baffle - Left Side
Procedure
- Install the front bumper fascia.
- Install the radiator air upper baffle.
RADIATOR AIR SIDE UPPER BAFFLE REPLACEMENT - RIGHT SIDE
Preliminary Procedures
1. Remove the radiator air upper baffle.
2. Remove the front bumper fascia.
- Radiator Air Side Upper Baffle - Right Side
Procedure
- Install the front bumper fascia.
- Install the radiator air upper baffle.
RADIATOR AIR UPPER BAFFLE REPLACEMENT
- Retainer [7x]
- Radiator Air Upper Baffle
COOLANT HEATER REPLACEMENT (2.0L LTG)
Preliminary Procedure
1. Drain the cooling system. Refer to Cooling System Draining and Filling (Static) or Cooling System Draining and Filling (GE 47716).
2. Remove the starter. Refer to Starter Replacement (2.0L LTG) or Starter Replacement (3.6L LGX).
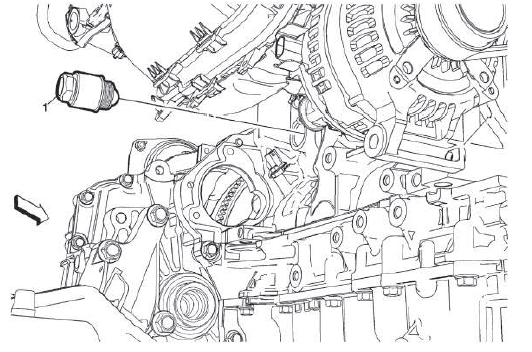
- Engine Coolant Heater
CAUTION: Refer to Component Fastener Tightening Caution.
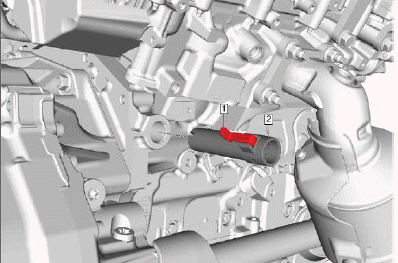
Procedure
Disconnect the engine coolant heater cord.
Tighten 50 N.m (37 lb ft)
COOLANT HEATER REPLACEMENT (3.6L LGX)
Preliminary Procedure
Lifting and Jacking the Vehicle.
- Engine Coolant Heater Clip
- Engine Coolant Heater
Procedure
Disconnect the coolant heater cord.
COOLANT HEATER CORD REPLACEMENT (2.0L LTG)
Preliminary Procedure
Raise and support the vehicle. Refer to Lifting and Jacking the Vehicle.
- Coolant Heater Connector
- Coolant Heater Cord
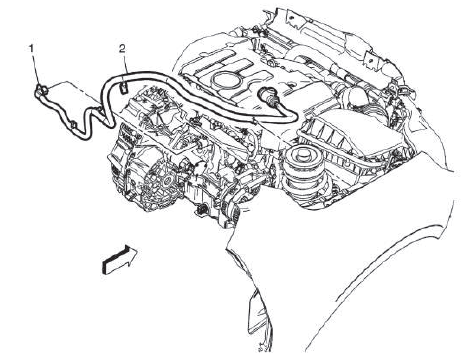
NOTE: Observe how the coolant heater cord was routed within the engine compartment.
COOLANT HEATER CORD REPLACEMENT (3.6L LGX)
Removal Procedure
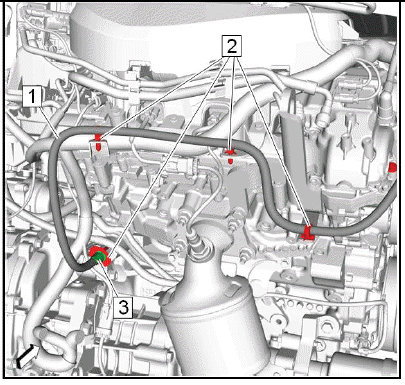
1.
Electrical Connector (2) - Disconnect.
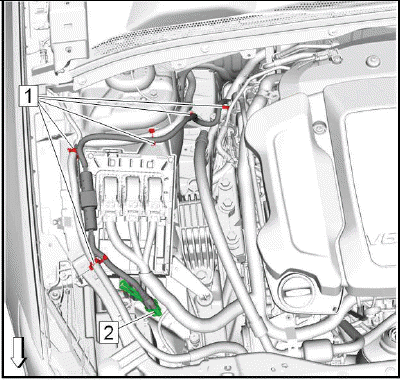
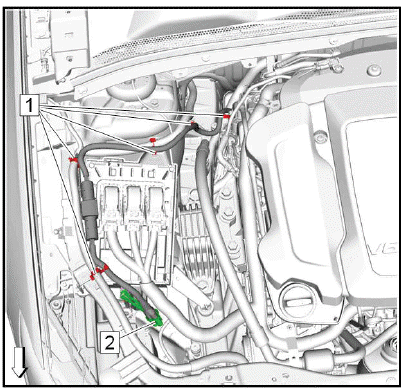
2. Coolant Heater Cord Clip (1) - Unclip [5x].
3.
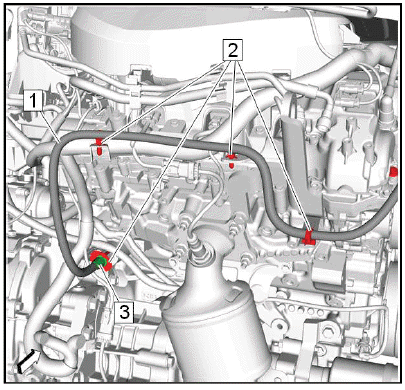
Coolant Heater Cord Clip (2) - Unclip [4x].
4. Electrical Connector (3) - Disconnect.
5. Coolant Heater Cord (1) - Remove.
Installation Procedure
1.
Coolant Heater Cord (1) - Install.
2. Electrical Connector (3) - Connect.
3. Coolant Heater Cord Clip (2) - Install [4x].
4.
Coolant Heater Cord Clip (1) - Install [5x].
5. Electrical Connector (2) - Connect.
READ NEXT:
 Cooling Fan Description and Operation
System Overview
The engine cooling fan system consists of 2 electric cooling fans and 3 fan
relays. The cooling fan relays
are arranged in a series/parallel (S/P) configuration. This allows the engin
Cooling System Description and Operation
Engine Coolant Indicators
The instrument panel cluster (IPC) shows the engine temperature on the
temperature gauge. The
value is sent on the data communication line from engine control module (EC
SEE MORE:
Radar Sensor Module - Long Range Learn
NOTE: Adaptive Cruise Temporarily Unavailable service message may be
displayed if this calibration procedure has to be performed. The radar
may have become misaligned.
After replacing and programming the Long Range Radar Sensor Module, it is
necessary to perform a
calibration procedure to align the
Special Tools and Equipment
SPECIAL TOOLS (DIAGNOSTIC TOOLS)
CH-34730-2C
J-34730-2C
Injector Test Lamp
CH-37287-1A
Fuel Pressure Gauge
Adapter 3/8"
CH-38641-B
J-38641-B
Diesel Fuel Quality
Tester
CH-39021-301
J-39021-301
Fuel Injector Harness
Adapter
CH-39021-460
J-39021-460
Fuel Injector Test
Adapter
CH-41415-30
GE-41415
