Buick Regal: Radiator Replacement (3.6L LGX)
Removal Procedure
1. Drain the cooling system.
2. Front Bumper Fascia - Remove.
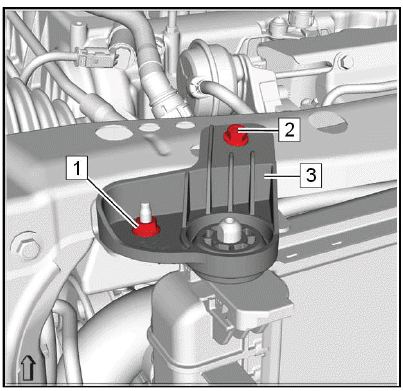
3.
.png)
Hood Primary Latch Mount Panel Bracket (3) - Remove.
4. Recover the refrigerant.
5.
.png)
Air Conditioning Condenser Bracket (1) - Remove.
6. Transmission Fluid Cooler Inlet and Outlet Pipe Retainer @ Engine Cooler Fan - Remove.
7.
.png)
Transmission Fluid Cooler Inlet Pipe (1) @ Radiator - Remove.
8.
.png)
Transmission Fluid Cooler Outlet Pipe (2) @ Radiator - Remove.
9. Intake Air Duct - Remove.
10.
.png)
Remove the engine coolant fan wiring harness ground nut (1).
11. Remove the engine coolant fan wiring harness (2) from the front end upper tie bar support.
12. Retainer @ Radiator - Unclip.
13.
.png)
Electrical Connector (1) - Disconnect [2x].
14.
.png)
Clamp (4) - Disengage.
15. Radiator Inlet Hose (3) - Remove.
16. Radiator Upper Bracket (5) - Remove.
17.
.png)
Clamp (1) - Disengage.
18. Radiator Outlet Hose (2) @ Radiator - Remove.
19.

Radiator Upper Bracket (3) - Remove.
20.
.png)
Radiator Sleeve (3) - Remove.
21.
.png)
Radiator Assembly (1) - Remove.
22. Radiator Lower Insulator (2) - Remove [2x].
23.
.png)
Engine Coolant Fan Shroud Clip (1) @ Engine Coolant Fan - Remove.
24.
.png)
Engine Coolant Fan Shroud Bolt (3) - Remove [2x].
25. Engine Coolant Fan (2) @ Radiator (1) - Remove.
26.
.png)
Radiator Upper Bracket (1) - Remove [2x].
27. Radiator Lower Bracket (4) - Remove [2x].
28. Remove the 4 radiator nuts (2, 5).
Installation Procedure
1.
.png)
Install the 4 radiator nuts (2, 5).
2. Radiator Upper Bracket (1) - Install [2x].
3. Radiator Lower Bracket (4) - Install [2x].
4.
.png)
Engine Coolant Fan (2) @ Radiator (1) - Install.
CAUTION: Refer to Fastener Caution.
5. Engine Coolant Fan Shroud Bolt (3) - Install and tighten [2x] 5.1N.m (45 lb in).
6.
.png)
Engine Coolant Fan Shroud Clip (1) @ Engine Coolant Fan - Install.
7. Radiator Lower Insulator (2) - Install [2x].
8.
.png)
Radiator Assembly (1) - Install.
9.
.png)
Radiator Sleeve (3) - Install.
10.
.png)
Radiator Upper Bracket (3) - Install.
11.
.png)
Radiator Outlet Hose (2) @ Radiator - Install.
12. Clamp (1) - Engage.
13.
.png)
Radiator Upper Bracket (5) - Install.
14. Radiator Inlet Hose (3) - Install.
15. Clamp (4) - Engage.
16.
.png)
Electrical Connector (1) - Connect [2x].
17. Retainer @ Radiator - Install.
18.
.png)
Install the engine coolant fan wiring harness (2) to the front end upper tie bar support.
19. Install and tighten the engine coolant fan wiring harness ground nut (1).
20. Intake Air Duct - Install.
21.
.png)
Transmission Fluid Cooler Outlet Pipe (2) @ Radiator - Install.
22.
.png)
Transmission Fluid Cooler Inlet Pipe (1) @ Radiator - Install.
23. Transmission Fluid Cooler Inlet and Outlet Pipe Retainer @ Engine Cooler Fan - Install.
24.
.png)
Air Conditioning Condenser Bracket (1) - Install.
25.
.png)
Hood Primary Latch Mount Panel Bracket (3) - Install.
26. Recharge the refrigerant.
27. Front Bumper Fascia - Install.
28. Fill the cooling system.

