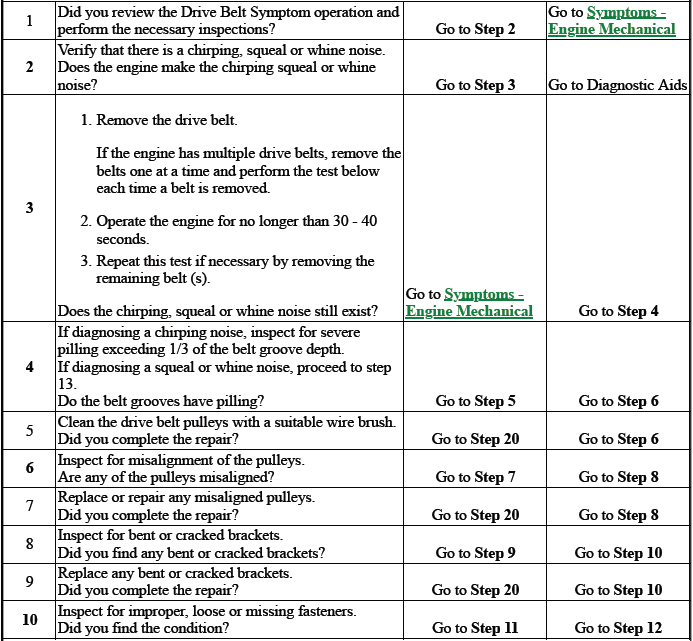
Buick Regal: Drive Belt Chirping, Squeal, and Whine Diagnosis
Diagnostic Aids
- A chirping or squeal noise may be intermittent due to moisture on the drive belts or the pulleys. It may be necessary to spray a small amount of water on the drive belts in order to duplicate the customers concern. If spraying water on the drive belt duplicates the symptom, cleaning the belt pulleys may be the probable solution.
- If the noise is intermittent, verify the accessory drive components by varying their loads making sure they are operated to their maximum capacity. An overcharged A/C system, power steering system with a pinched hose or wrong fluid, or a generator failing are suggested items to inspect.
- A chirping, squeal or whine noise may be caused by a loose or improper installation of a body or suspension component. Other items of the vehicle may also cause the noise.
- The drive belts will not cause a whine noise.
Test Description
The numbers below refer to the step numbers in the diagnostic table below.
2
The noise may not be engine related. This step is to verify that the engine is making the noise. If the engine is not making the noise do not proceed further with this table.
3
The noise may be an internal engine noise. Removing the drive belts one at a time and operating the engine for a brief period will verify the noise is related to the drive belt. When removing the drive belt the water pump may not be operating and the engine may overheat. Also DTCs may set when the engine is operating with the drive belts removed.
4
Inspect all drive belt pulleys for pilling. Pilling is the small balls or pills or it can be strings in the drive belt grooves from the accumulation of rubber dust.
6
Misalignment of the pulleys may be caused from improper mounting of the accessory drive component, incorrect installation of the accessory drive component pulley, or the pulley bent inward or outward from a previous repair. Test for a misaligned pulley using a straight edge in the pulley grooves across two or three pulleys. If a misaligned pulley is found refer to that accessory drive component for the proper installation procedure for that pulley.
10
Inspecting of the fasteners can eliminate the possibility that a wrong bolt, nut, spacer, or washer was installed.
12
Inspecting the pulleys for being bent should include inspecting for a dent or other damage to the pulleys that would prevent the drive belt from not seating properly in all of the pulley grooves or on the smooth surface of a pulley when the back side of the belt is used to drive the pulley.
14
This test is to verify that the drive belt tensioner operates properly. If the drive belt tensioner is not operating properly, proper belt tension may not be achieved to keep the drive belt from slipping which could cause a squeal noise.
15
This test is to verify that the drive belt is not too long, which would prevent the drive belt tensioner from working properly. Also if an incorrect length drive belt was installed, it may not be routed properly and may be turning an accessory drive component in the wrong direction.
16
Misalignment of the pulleys may be caused from improper mounting of the accessory drive component, incorrect installation of the accessory drive component pulley, or the pulley bent inward or outward from a previous repair. Test for a misaligned pulley using a straight edge in the pulley grooves across two or three pulleys. If a misaligned pulley is found refer to that accessory drive component for the proper installation procedure for that pulley.
17
This test is to verify that the pulleys are the correct diameter or width. Using a known good vehicle compare the pulley sizes.
19
Replacing the drive belt when it is not damaged or there is not excessive pilling will only be a temporary repair.
CAUTION: Refer to Belt Dressing Caution.
DEFINITION: The following items are indications of chirping:
- A high pitched noise that is heard once per revolution of the drive belt or a pulley.
- Chirping may occur on cold damp start-ups and will subside once the vehicle reaches normal operating temp.
DEFINITION: The following items are indications of drive belt squeal:
- A loud screeching noise that is caused by a slipping drive belt. This is unusual for a drive belt with multiple ribs.
- The noise occurs when a heavy load is applied to the drive belt, such as an air conditioning compressor engagement snapping the throttle, or slipping on a seized pulley or a faulty accessory drive component.
DEFINITION: The following items are indications of drive belt whine:
- A high pitched continuous noise.
- The noise may be caused by an accessory drive component failed bearing.

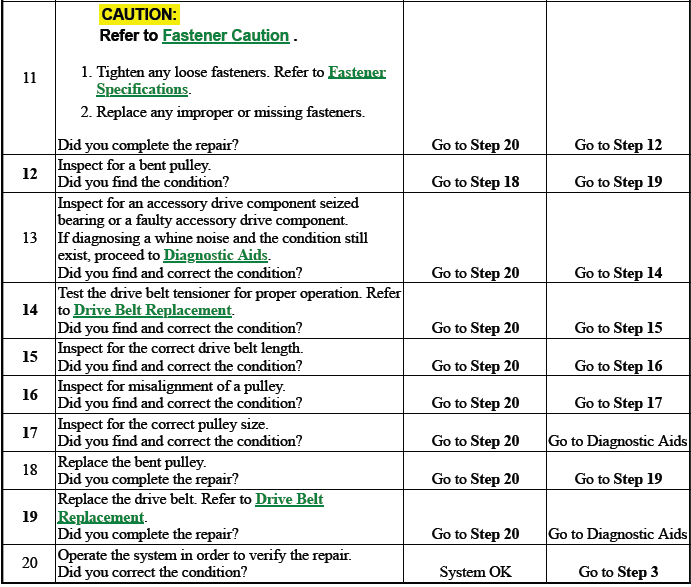
DRIVE BELT RUMBLING AND VIBRATION DIAGNOSIS
Diagnostic Aids
The accessory drive components can have an affect on engine vibration. Vibration from the engine operating may cause a body component or another part of the vehicle to make rumbling noise. Vibration can be caused by, but not limited to the A/C system over charged, the power steering system restricted or the incorrect fluid, or an extra load on the generator. To help identify an intermittent or an improper condition, vary the loads on the accessory drive components.
The drive belt may have a rumbling condition that can not be seen or felt. Sometimes replacing the drive belt may be the only repair for the symptom.
If replacing the drive belt, completing the diagnostic table, and the noise is only heard when the drive belts are installed, there might be an accessory drive component with a failure. Varying the load on the different accessory drive components may aid in identifying which component is causing the rumbling noise.
Test Description
The numbers below refer to the step numbers in the diagnostic table below.
2
This test is to verify that the symptom is present during diagnosing. Other vehicle components may cause a similar symptom.
3
This test is to verify that one of the drive belts is causing the rumbling noise or vibration. Rumbling noise may be confused with an internal engine noise due to the similarity in the description. Remove only one drive belt at a time if the vehicle has multiple drive belts. When removing the drive belts the water pump may not be operating and the engine may overheat. Also DTCs may set when the engine is operating with the drive belts removed.
4
Inspecting the drive belts is to ensure that they are not causing the noise. Small cracks across the ribs of the drive belt will not cause the noise. Belt separation is identified by the plys of the belt separating and may be seen at the edge of the belt our felt as a lump in the belt.
5
Small amounts of pilling is normal condition and acceptable. When the pilling is severe the drive belt does not have a smooth surface for proper operation.
9
Inspecting of the fasteners can eliminate the possibility that the wrong bolt, nut, spacer, or washer was installed.
11
This step should only be performed if the water pump is driven by the drive belt. Inspect the water pump shaft for being bent. Also inspect the water pump bearings for smooth operation and excessive play. Compare the water pump with a known good water pump.
12
Accessory drive component brackets that are bent, cracked, or loose may put extra strain on that accessory component causing it to vibrate.
CAUTION: Refer to Belt Dressing Caution.
DEFINITION: The following items are indications of drive belt rumbling:
- A low pitch tapping, knocking, or thumping noise heard at or just above idle.
- Heard once per revolution of the drive belt or a pulley.
- Rumbling may be caused from:
- Pilling, the accumulation of rubber dust that forms small balls (pills) or strings in the drive belt pulley groove
- The separation of the drive belt
- A damaged drive belt
DEFINITION: The following items are indications of drive belt vibration:
- The vibration is engine-speed related.
- The vibration may be sensitive to accessory load.

DRIVE BELT FALLS OFF AND EXCESSIVE WEAR DIAGNOSIS
Diagnostic Aids
If the drive belt repeatedly falls off the drive belt pulleys, this is because of pulley misalignment.
An extra load that is quickly applied on released by an accessory drive component may cause the drive belt to fall off the pulleys. Verify the accessory drive components operate properly.
If the drive belt is the incorrect length, the drive belt tensioner may not keep the proper tension on the drive belt.
Excessive wear on a drive belt is usually caused by an incorrect installation or the wrong drive belt for the application.
Minor misalignment of the drive belt pulleys will not cause excessive wear, but will probably cause the drive belt to make a noise or to fall off.
Excessive misalignment of the drive belt pulleys will cause excessive wear but may also make the drive belt fall off.
Test Description
The numbers below refer to the step numbers in the diagnostic table below.
2
This inspection is to verify the condition of the drive belt. Damage may of occurred to the drive belt when the drive belt fell off. The drive belt may of been damaged, which caused the drive belt to fall off. Inspect the belt for cuts, tears, sections of ribs missing, or damaged belt plys.
4
Misalignment of the pulleys may be caused from improper mounting of the accessory drive component, incorrect installation of the accessory drive component pulley, or the pulley bent inward or outward from a previous repair. Test for a misaligned pulley using a straight edge in the pulley grooves across 2 or 3 pulleys.
If a misaligned pulley is found refer to that accessory drive component for the proper installation procedure of that pulley.
5
Inspecting the pulleys for being bent should include inspecting for a dent or other damage to the pulleys that would prevent the drive belt from not seating properly in all of the pulley grooves or on the smooth surface of a pulley when the back side of the belt is used to drive the pulley.
6
Accessory drive component brackets that are bent or cracked will let the drive belt fall off.
7
Inspecting of the fasteners can eliminate the possibility that a wrong bolt, nut, spacer, or washer was installed.
Missing. loose, or the wrong fasteners may cause pulley misalignment from the bracket moving under load.
Over tightening of the fasteners may cause misalignment of the accessory component bracket.
13
The inspection is to verify the drive belt is correctly installed on all of the drive belt pulleys. Wear on the drive belt may be caused by mis-positioning the drive belt by one groove on a pulley.
14
The installation of a drive belt that is too wide or too narrow will cause wear on the drive belt. The drive belt ribs should match all of the grooves on all of the pulleys.
15
This inspection is to verify the drive belt is not contacting any parts of the engine or body while the engine is operating. There should be sufficient clearance when the drive belt accessory drive components load varies.
The drive belt should not come in contact with an engine or a body component when snapping the throttle.
CAUTION: Refer to Belt Dressing Caution.
DEFINITION: The drive belt falls off the pulleys or may not ride correctly on the pulleys.
DEFINITION: Wear at the outside ribs of the drive belt due to an incorrectly installed drive belt.

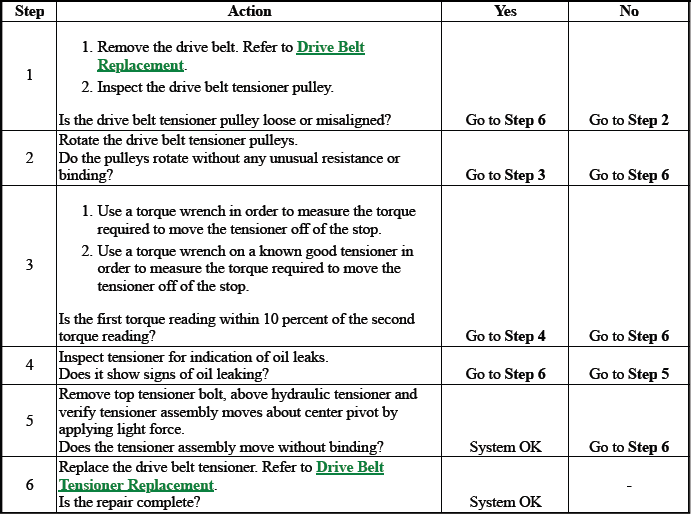
DRIVE BELT TENSIONER DIAGNOSIS
READ NEXT:
 Intake Manifold Cover Replacement
Engine Oil Filler Cap
Intake Manifold Cover Bolt [3x]
Tighten
9 N.m (80 lb in)
Intake Manifold Cover
DRIVE BELT REPLACEMENT
Fig. 1: Drive Belt Routing Diagram (2.0L)
Preliminary Procedure
Turbocharger Heat Shield Replacement
Turbocharger Heat Shield Bolt [3x]
CAUTION: Refer to Fastener Caution.
NOTE: In the event that a bolt breaks upon removal of components, perform
an extraction of the broken bolt.
Tighten 14 N.
SEE MORE:
Connector Reconnection - Automatic Transmission
Special Tools
EL-35616 Terminal Test Probe Kit
For equivalent regional tools, refer to Special Tools.
When the condition is not currently present, but is indicated in DTC history,
the cause may be intermittent. An
intermittent may also be the cause when there is a customer complaint, but the
sympt
Component Locator
DISASSEMBLED VIEWS
Case and Associated Parts (1 of 2)
Transmission Control Module Bolt [3x]
Transmission Control Module
Manual Shift Shaft Seal
Transmission Fluid Filler Tube Plug
Transmission Fluid Filler Tube Shipping Plug Seal
Front Wheel Drive Shaft Oil Seal- Right Side
Automatic Transm
