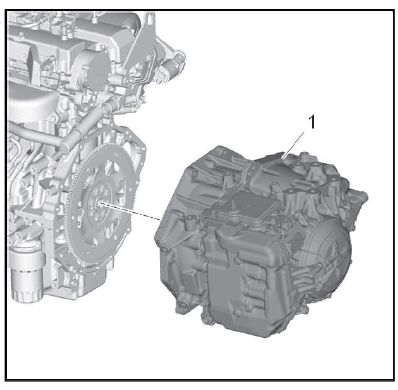
Buick Regal: Engine Replacement
Removal Procedure
1. Upper Intermediate Steering Shaft - Remove.
2. Recover the refrigerant. Refrigerant Recovery and Recharging (R-1234yf).
3. Drain the coolant. Cooling System Draining and Filling (Static) Cooling System Draining and Filling (GE 47716).
4. Engine Control Module - Remove.
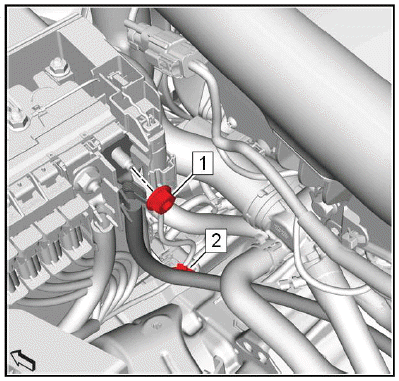
5.

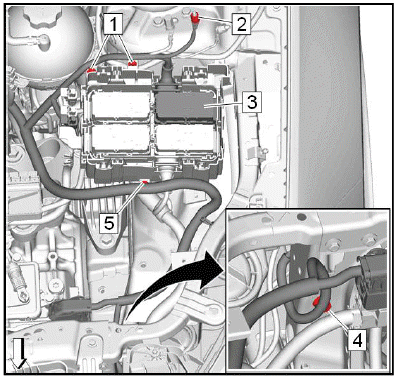
Retaining Tab (2) - Unclip [2x].
6. Battery Distribution Fuse Block Cover (1) - Remove.
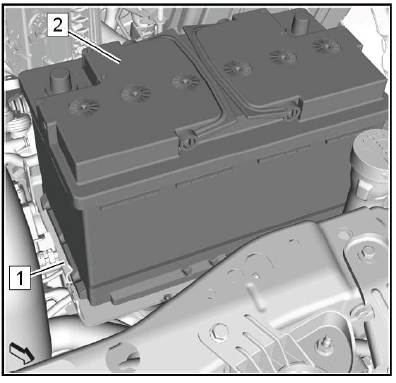
7.
Retainer (2) - Unclip.
8. Battery Positive Cable Nut (1) - Remove.
9.
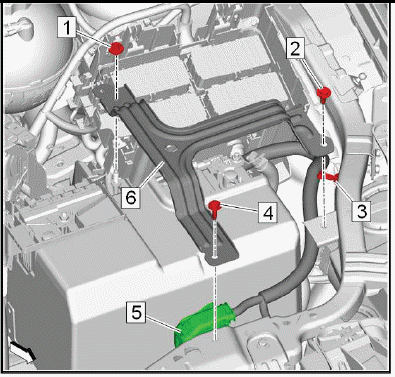
Battery Hold Down Retainer Nut (1) - Remove.
10. Battery Hold Down Bolt (2, 4) - Remove [2x].
11. Battery Hold Down Retainer (6) - Remove.
12. Wiring Harness Retainer (3) - Unclip.
13. Disconnect the electrical connector. (5)
14.
Remove the battery. (2) Battery Replacement (2.0L LTG) 15.
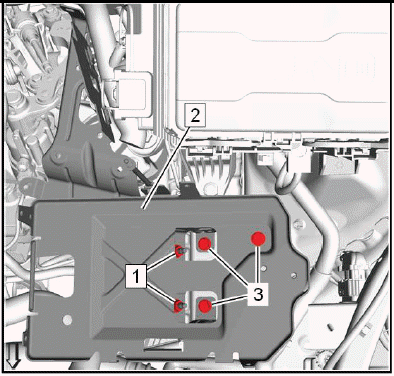
Remove the battery tray. (2) Battery Tray Replacement.
16. Engine Wiring Harness Junction Block - Remove.
17.
Ground Cable Nut (2) - Remove.
18. Wiring Harness Retainer (1, 4, 5) - Remove [4x].
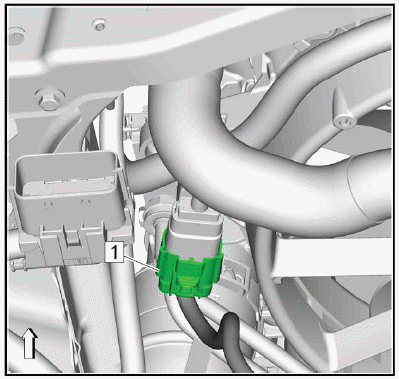
19. Electrical Connector (3) - Unclip.
20.
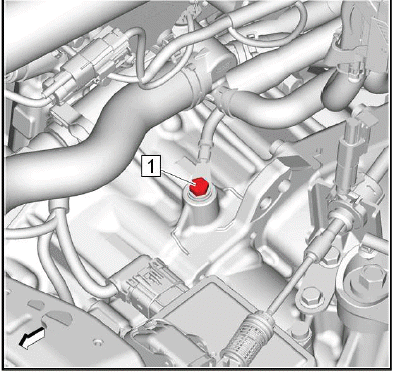
Ground Cable Bolt (1) - Remove.
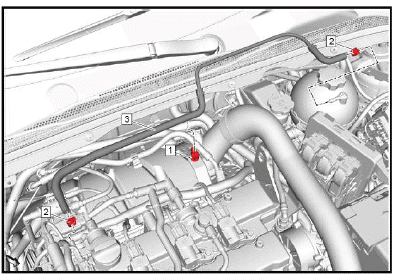
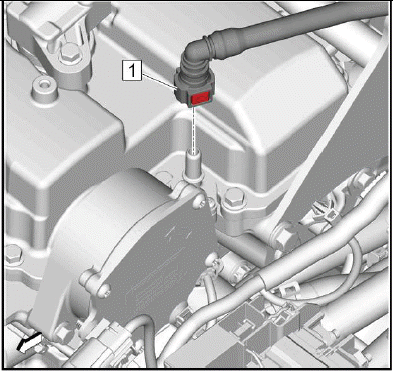
21.
Disconnect the electrical connector. (1)
22.
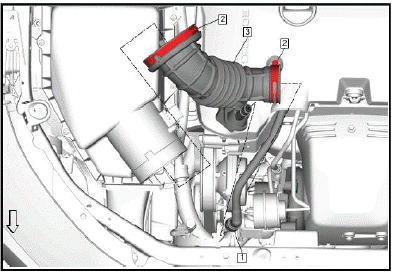
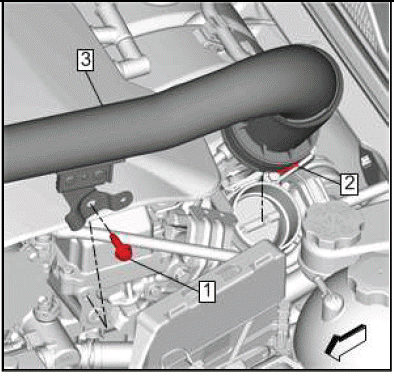
NOTE: The Positive Crankcase Ventilation (PCV) tube has a tamper-proof fitting and cannot be disconnected without damage to the PCV tube. Only disconnect the PCV tube if replacing the air cleaner outlet duct. If repositioning the air cleaner outlet duct, leave the PCV tube connected.
Air Cleaner Outlet Duct (3) - Remove.
23.
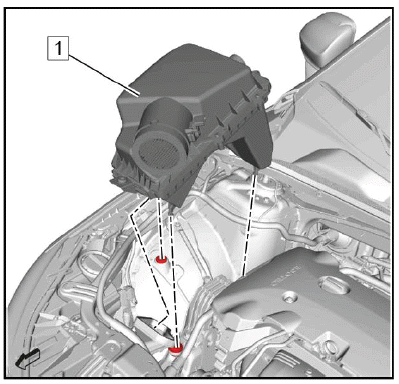
Air Cleaner Assembly (1) - Remove.
24.
Engine Coolant Air Bleed Hose (3) - Remove.
25. Fuel Feed Front Pipe - Remove.
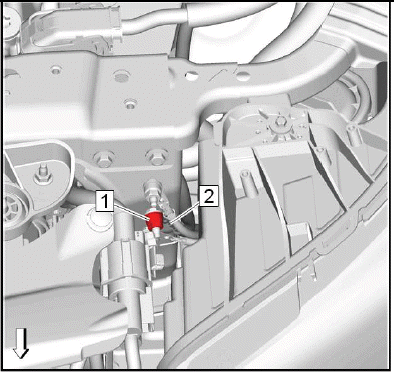
26.
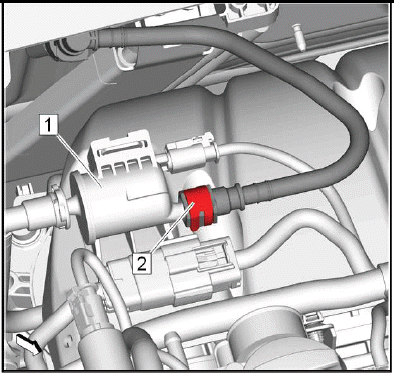
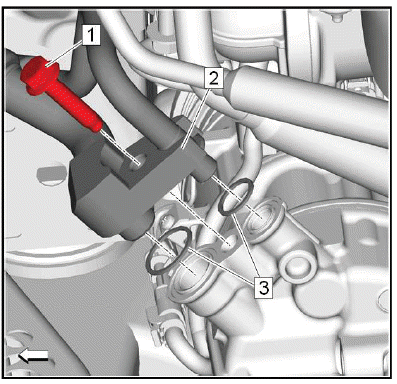
Evaporative Emission Front Pipe (2) @ Evaporative Emission Canister Purge Solenoid Valve (1) - Disconnect.
27. Close all connections with EN-6015 plugs.
28.
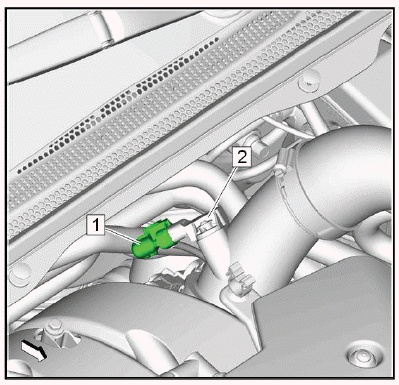
Electrical Connector (1) @ Intake Air Pressure and Temperature Sensor (2) - Disconnect.
29.
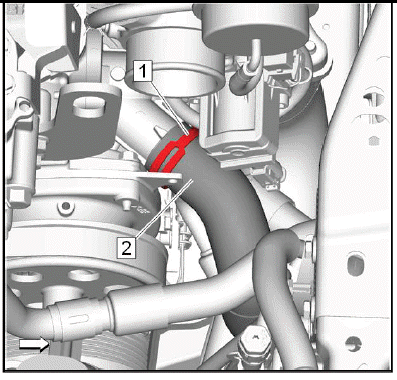
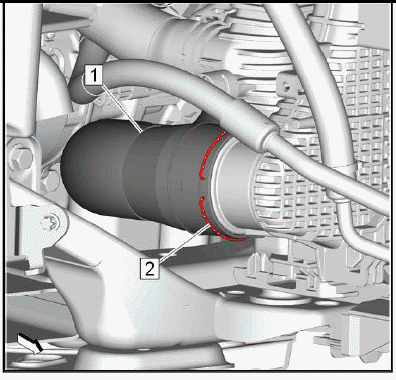
Charge Air Cooler Outlet Air Tube Fastener (1) - Remove.
30. Retainer Spring (2) - Release.
31. Charge Air Cooler Outlet Air Tube (3) - Disconnect.
32.
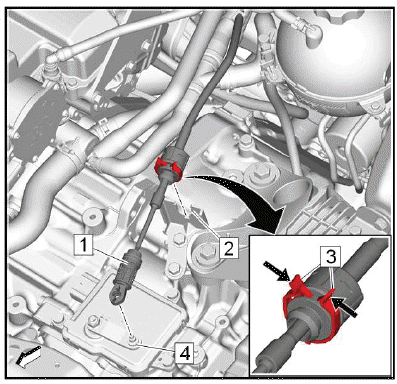
Range Selector Lever Cable (1) @ Range Selector Lever Cable Lever (4) - Remove - Use a suitable tool.
33. Range Selector Lever Cable (1) @ Transmission Range Selector Lever Cable Bracket (2) - Remove.
Push the lashes (3) in direction of arrow to release the range selector lever cable from the bracket.
34.
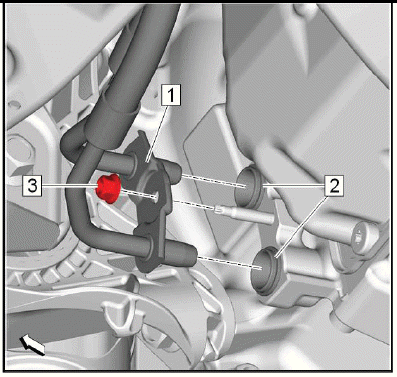
Power Brake Booster Vacuum Pipe (1) - Disconnect.
35.
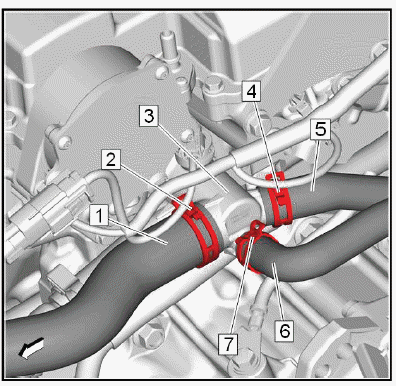
Clamp (2, 4, 7) - Remove [3x].
36. Radiator Inlet Hose (1) @ Water Outlet (3) - Disconnect.
37. Heater Inlet Hose (5) @ Water Outlet (3) - Disconnect.
38. Heater Outlet Hose (6) @ Water Outlet (3) - Disconnect.
39.
Clamp (1) - Remove.
40. Radiator Outlet Hose (2) - Disconnect.
41.
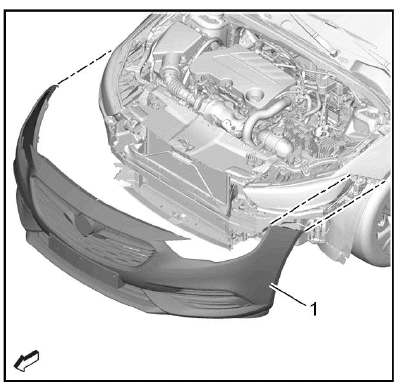
Front Bumper Fascia (1) - Remove.
42.
Ground Cable Nut (1) - Remove.
43. Ground Cable (2) - Remove.
44.
Charge Air Cooler Inlet Air Tube Bolt (1) - Remove.
45. Warm Up Three-Way Catalytic Converter - Remove.
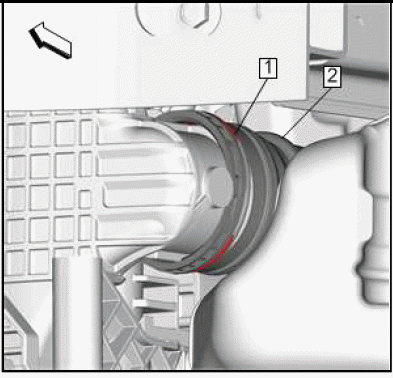
46.
Retainer Spring (2) - Release.
47. Charge Air Cooler Inlet Air Tube (1) - Disconnect.
48.
Charge Air Cooler Inlet Air Tube Bolt (2) - Remove.
49. Charge Air Cooler Inlet Air Tube (3) - Remove.
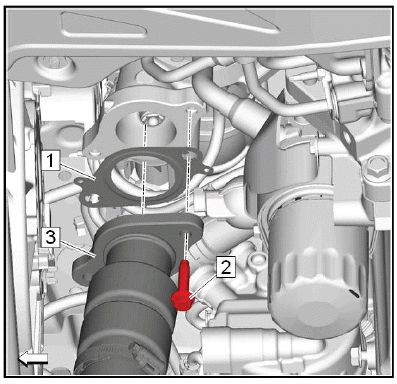
50. Remove and DISCARD the gasket. (1)
51.
Retainer Spring (1) - Release.
52. Charge Air Cooler Outlet Air Tube (2) - Remove.
53.
Air Conditioning Compressor and Condenser Hose Bolt (1) - Remove.
54. Air Conditioning Compressor and Condenser Hose (2) - Remove.
55. Seal Ring (3) - Remove and DISCARD [2x].
56. Remove the front tire and wheel assemblies.
57.

Front Compartment Splash Shield (4) - Remove.
58.
Front Compartment Air Deflector (4) - Remove.
59.

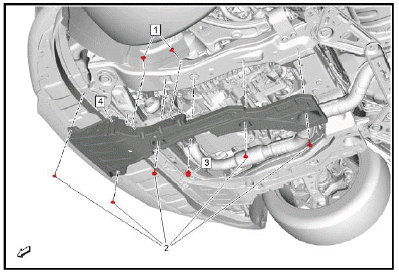
Propeller Shaft (1) - Remove.
60.
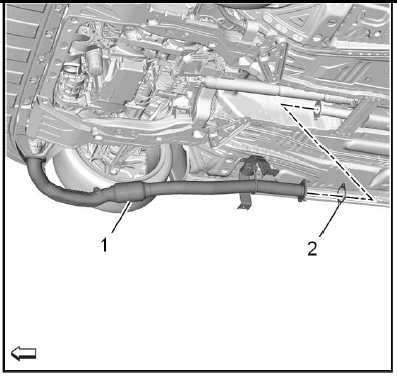
Exhaust Front Pipe (1) - Remove.
61.
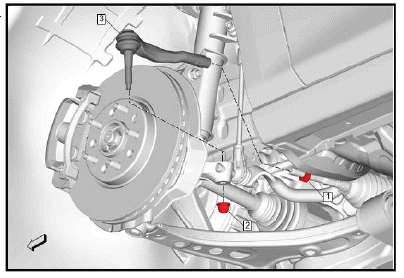
Steering Linkage Outer Tie Rod (3) @ Steering Knuckle - Separate [2x].
62.
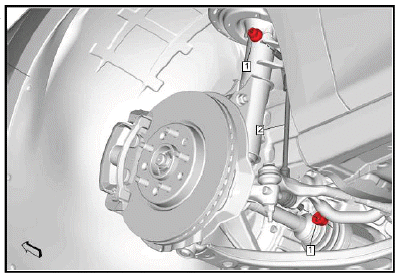
Stabilizer Shaft Link (2) @ Stabilizer Shaft - Separate [2x].
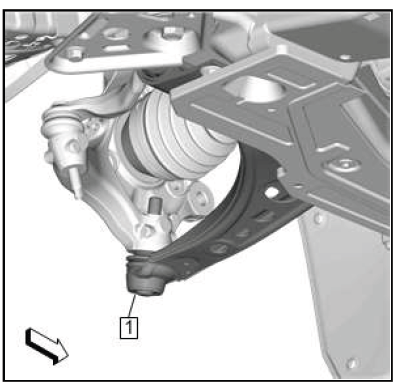
63.
{ If equipped }Front Suspension Automatic Forward Lighting Position Sensor (1) @ Lower Control Arm - Separate [2x].
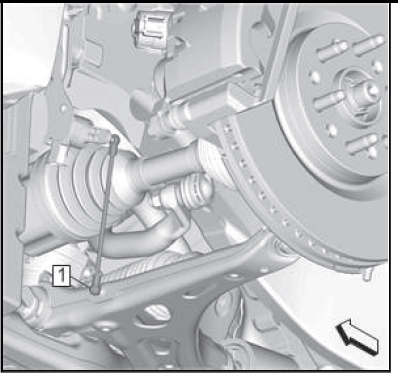
64.
Lower Control Arm (1) @ Steering Knuckle - Separate [2x].
65. Drain the transmission fluid.
66. Power Transfer Unit Case - Remove.
67. Front Wheel Drive Half Shaft - Left Side @ Front Wheel Bearing - Remove.
68.
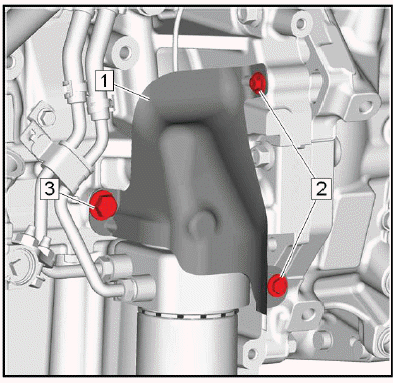
Transmission Fluid Cooler Inlet and Outlet Pipe Nut (3) - Remove.
69. Transmission Fluid Cooler Inlet and Outlet Pipe (1) - Remove.
70. Plug and / or cap the hose and transmission to prevent contamination.
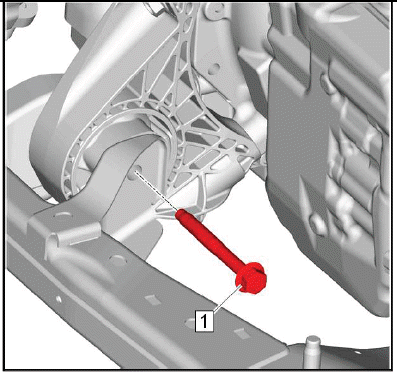
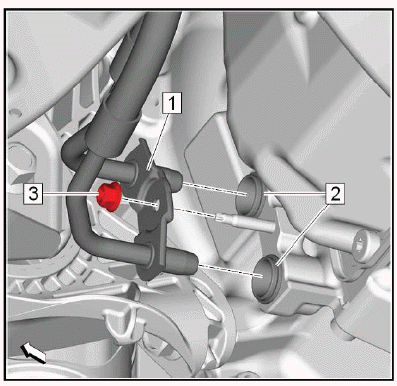
71.
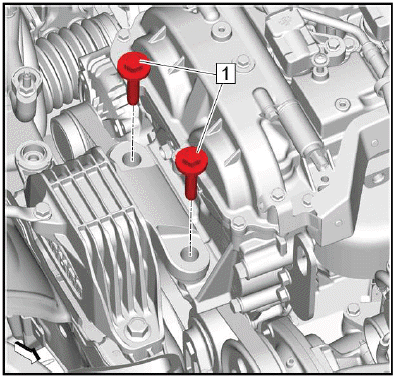
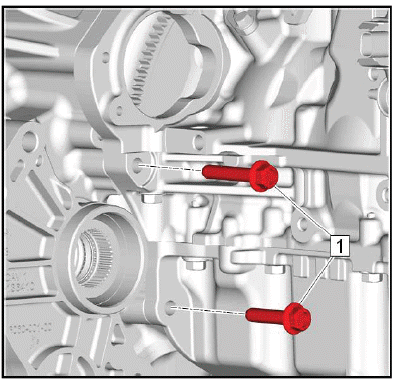
Engine Mount Bolt (1) - Remove and DISCARD [2x].
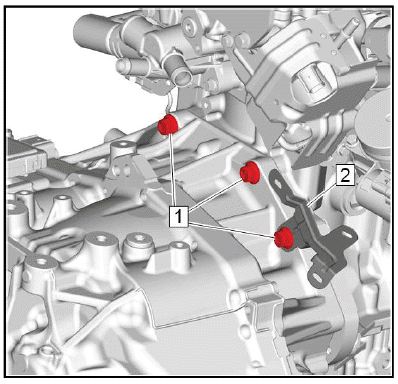
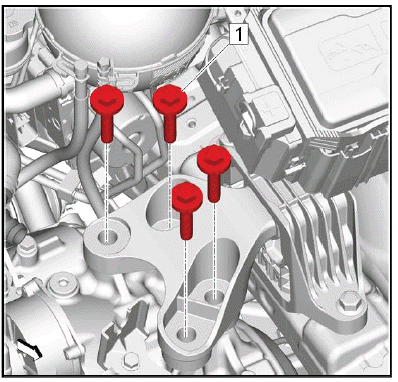
72.
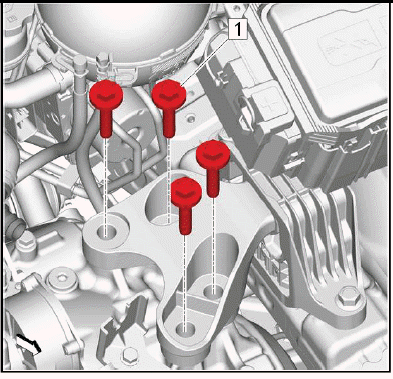
Remove and DISCARD the 4 transmission mount transmission side bolts (1).
73.
Front Cradle Brace-Both Sides - Remove - Front Cradle Brace Replacement.
74.
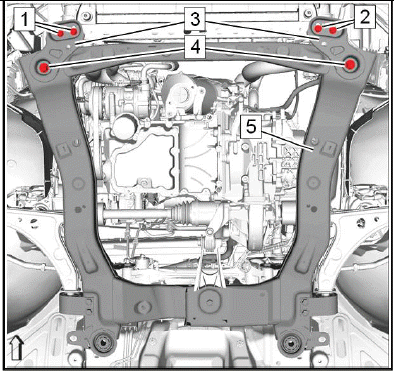
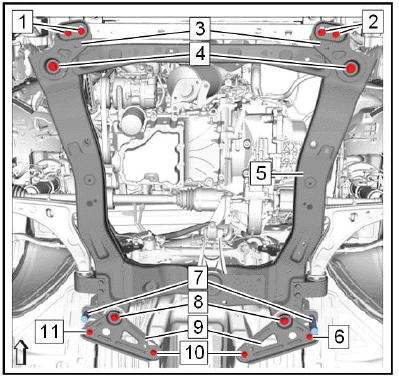
NOTE: A second technician is required.
Simplified graphic. Engine/transmission unit is fixed with engine support tool to suspension frame. Suspension frame is supported by centering frame and base frame.
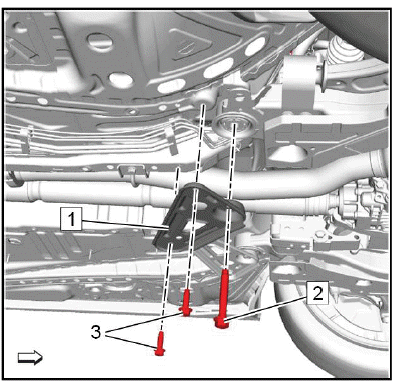
Front Cradle Brace Bolt (1, 2) - Remove [4x].
75. Drivetrain and Front Suspension Cradle Front Bolt (4) - Remove [2x].
76. Front Cradle Mount Bolt Bracket (3) - Remove [2x].
77. Carefully lower the engine table and raise the body on the hoist until the engine/transmission and frame are separated from the vehicle.
Disassemble Procedure
1. Front Wheel Drive Half Shaft-Left Side - Remove.
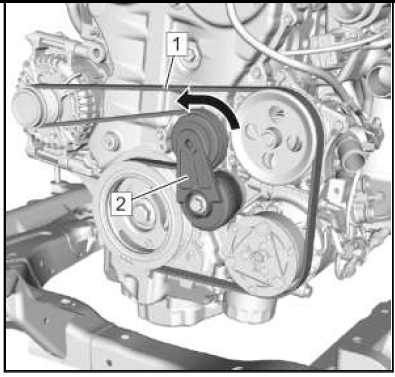
2.
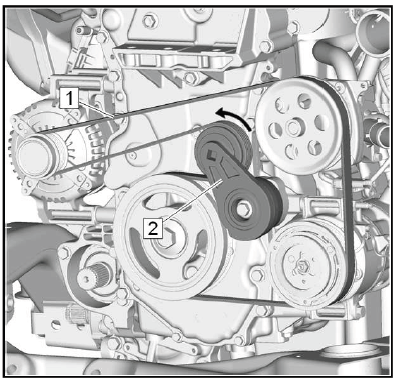
Tension the drive belt tensioner (2) in arrow direction and hold tension.
NOTE: A second technician is required.
3. Drive Belt (1) - Remove.
4. Slowly release the tension on the drive belt tensioner (2).
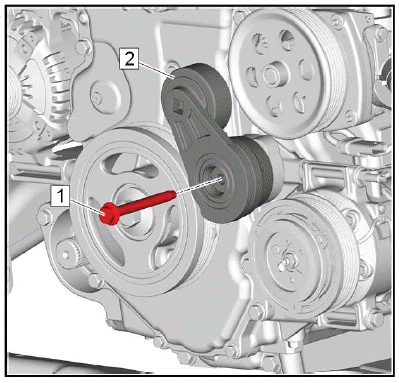
5.
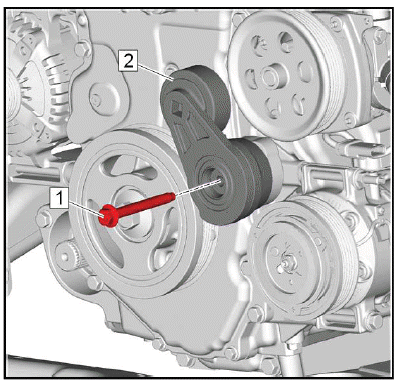
Drive Belt Tensioner Bolt (1) - Remove.
6. Drive Belt Tensioner (2) - Remove.
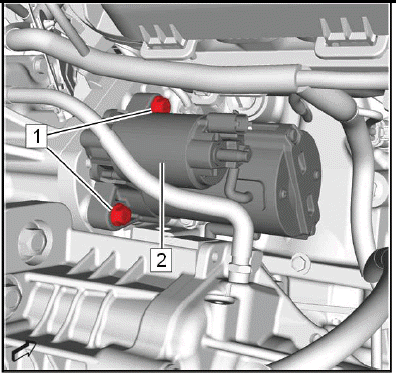
7. Battery Positive Cable - Remove.
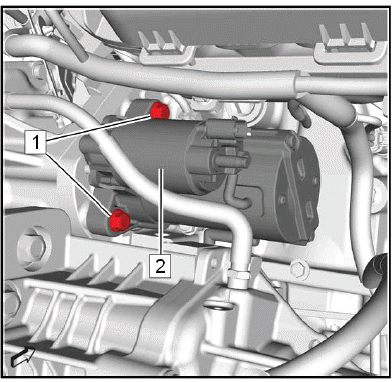
Starter (2) - Remove.
9.
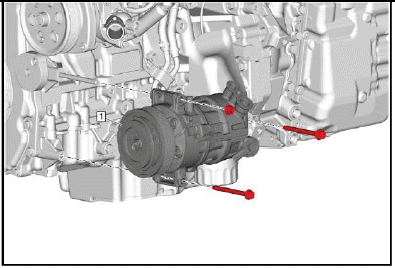
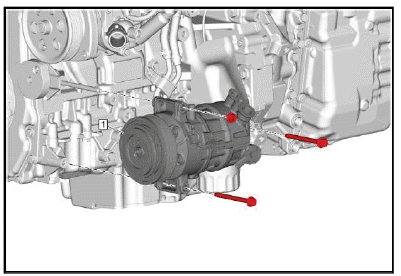
Air Conditioning Compressor (1) - Remove.
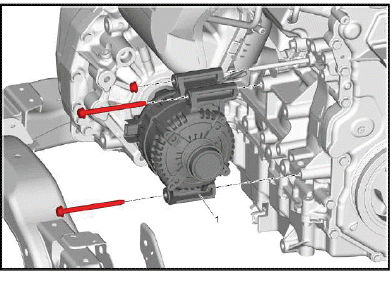
10.
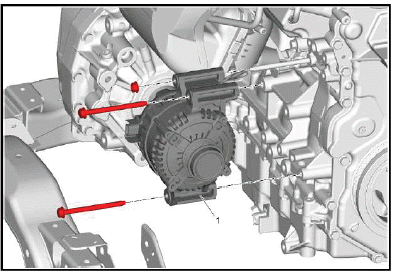
Generator (1) - Remove.
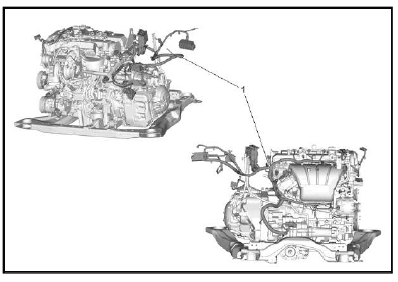
11.

Engine Wiring Harness (1) - Remove.
12. Install a suitable cable to the 3 engine lift brackets.
13. Install a suitable engine lifting device to the cable.
14. Extend the engine lifting device until the steel cables are slightly tensioned.
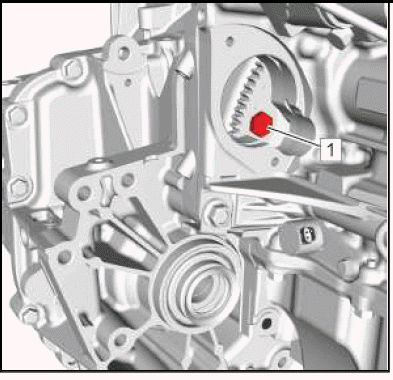
15.
Remove and DISCARD the transmission front mount bolt (1).
16. Put the engine transmission unit down on a wooden pallet.
17.

Torque Converter @ Flex Plate - Loosen
- Turn the engine at the crankshaft balancer clockwise with a suitable tool, until a torque converter bolt (1) shows up.
- Remove and DISCARD the first torque converter bolt.
- Turn the engine at the crankshaft balancer clockwise 60 degrees.
- Remove and DISCARD the second torque converter bolt.
- Repeat the previous 4 steps for the third torque converter bolt.
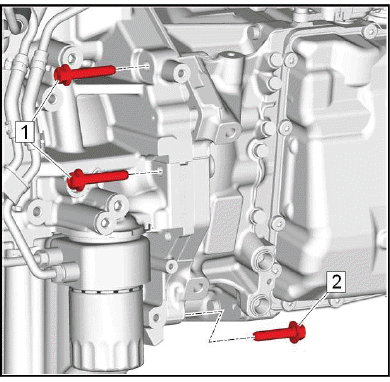
18.

Transmission Bolt (1) - Remove [2x].
19.
Pump and Component Oil Heat Shield Bolt (2) - Remove [2x].
20. Remove the oil pump flow control valve heat shield bolt (3).
21. Oil Pump Flow Control Valve Heat Shield (1) - Remove.
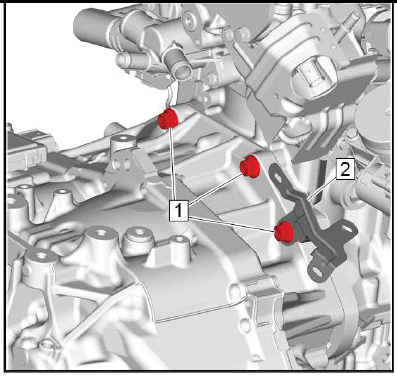
22.

Transmission Bolt (1, 2) - Remove [3x].
23.
Transmission Bolt (1) - Remove [3x].
24. Wiring Harness Bracket (2) - Remove.
25.
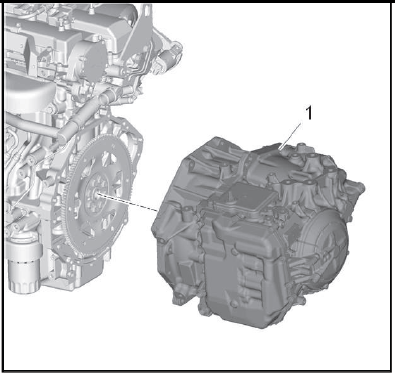
NOTE: A second technician is required.
Transmission (1) - Remove.
26. Install the engine to a suitable engine stand.
27. Transfer components as necessary.
Assemble Procedure
1. Remove the engine from the engine stand.
2. Put the engine down on a wooden pallet.
3.
NOTE: A second technician is required.
Transmission (1) - Install.
4.
CAUTION: Fastener Caution.
Wiring Harness Bracket (2) - Install.
5. Transmission Bolt (1) - Install and tighten [3x]58N.m (43 lb ft).
6.
Transmission Bolt (1, 2) - Install and tighten [3x]58N.m (43 lb ft).
7.
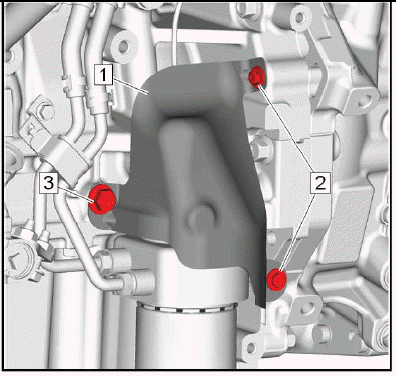
Oil Pump Flow Control Valve Heat Shield (1) - Install.
8. Install the oil pump flow control valve heat shield bolt (3) and tighten to 58N.m (43 lb ft).
9. Pump and Component Oil Heat Shield Bolt (2) - Install and tighten [2x]9N.m (80 lb in).
10.
Transmission Bolt (1) - Remove [2x]58N.m (43 lb ft).
11.
Torque Converter @ Flex Plate - Install.
- Turn the engine at the crankshaft balance clockwise with a suitable tool, until a torque converter bolt (1) shows up.
NOTE: Service may offer bolts without microencapsulated thread locking adhesive. If this is the case, apply thread locking adhesive to the bolt.
If fasteners are microencapsulated, install NEW torque converter to flexplate bolts. Do NOT reuse the old bolts.
- Install the first NEW torque converter bolt (1) and tighten to 60N.m (44 lb ft).
- Turn the engine at the crankshaft balancer clockwise 60 degrees.
- Install the second NEW torque converter bolt and tighten to 60N.m (44 lb ft).
- Repeat the previous 4 steps for the third torque converter bolt.
12. Place the engine transmission unit to the suspension frame.
13.

Install the NEW transmission front mount bolt and tighten to 100N.m (74 lb ft).
14. Remove the engine lifting device and the cable from the engine.
15.
Engine Wiring Harness (1) - Install.
16.
Generator (1) - Install - Generator Replacement (2.0L LTG).
17.
Air Conditioning Compressor (1) - Install.
18.
Starter (2) - Install.
19. Battery Positive Cable - Install.
20.
Drive Belt Tensioner (1) - Install.
21. Drive Belt Tensioner Bolt (2) - Install and tighten58N.m (43 lb ft).
22.
Tension the drive belt tensioner (2) in arrow direction and hold tension.
NOTE: A second technician is required.
23. Drive Belt (1) - Remove.
24. Slowly release the tension on the drive belt tensioner (2).
25. Front Wheel Drive Half Shaft @ Transmission - Install.
Installation Procedure
1.
NOTE:
- A second technician is required.
- Simplified graphic. Engine/transmission unit is fixed with engine support tool to suspension frame. Suspension frame is supported by centering frame and base frame.
- During the tightening procedure check that the pins (7) slide easily in their holes.
Raise the drivetrain and front suspension frame (5) and install it with the engine transmission to the vehicle.
2. Front Cradle Mount Bolt Bracket (3) - Install [2x].
3. Drivetrain and Front Suspension Cradle Front Bolt (4) - Install and hand tighten [2x].
4. Front Cradle Brace Bolt (1, 2) - Install and hand tighten [4x].
5. Front Cradle Brace (9) - Install [2x].
6. Drivetrain and Front Suspension Cradle Rear Bolt (8) - Install and hand tighten [2x].
7. Front Cradle Brace Bolt (6, 10, 11) - Install and hand tighten [4x].
8. Install the 2 CH - 51034 pins (7) to arrange the front suspension frame during tightening.
9. Make sure that the drivetrain and front suspension frame (5) fits closely to the vehicle.
10. Make sure that the 2 CH - 51034 pins (7) fit closely to the drivetrain and front suspension frame (5).
11. Drivetrain and Front Suspension Cradle Front Bolt (4) - Tighten [2x]160N.m (118 lb ft).
12. Drivetrain and Front Suspension Cradle Rear Bolt (8) - Tighten [2x]160N.m (118 lb ft).
13. Front Cradle Brace Bolt (1, 2) - Tighten [4x]58N.m (43 lb ft).
14. Front Cradle Brace Bolt (6, 10, 11) - Tighten [4x]58N.m (43 lb ft).
15. Remove the 2 CH - 51034 pins (7) to arrange the front suspension frame during tightening.
16. Lower the vehicle.
17.
CAUTION: Torque-to-Yield Fastener Caution
Transmission Mount Bolt (1) - Install and tighten the NEW bolt. [4x]
- First Pass: 100N.m (74 lb ft)
- Final Pass: 60 - 75 degrees - Use the special tool: EN-45059 Angle Meter
18.

CAUTION: Torque-to-Yield Fastener Caution.
Engine Mount Bolt (1) - Install and tighten the NEW bolt. [2x].
- First Pass: 100N.m (74 lb ft).
- Final Pass: 60 - 75 degrees - Use the special tool: EN-45059 Angle Meter
19. Raise the vehicle.
20. Remove the plugs and / or caps from the hose and transmission.
21.
Transmission Fluid Cooler Inlet and Outlet Pipe (1) - Install.
22. Transmission Fluid Cooler Inlet and Outlet Pipe Nut (3) - Install and tighten10N.m (89 lb in).
23. Power Transfer Unit Case - Install.
24. Front Wheel Drive Half Shaft - Left Side @ Front Wheel Bearing - Install.
25.
.png)
Lower Control Arm (1) @ Steering Knuckle - Install [2x].
26.
.png)
{ If equipped }Front Suspension Automatic Forward Lighting Position Sensor (1) @ Lower Control Arm - Install [2x].
27.
.png)
Stabilizer Shaft Link (2) @ Stabilizer Shaft - Install [2x].
28.
.png)
Steering Linkage Outer Tie Rod (3) @ Steering Knuckle - Install [2x].
29.
.png)
Exhaust Front Pipe (1) - Install.
30.
.png)
Propeller Shaft (1) - Install.
31.
.png)
Front Compartment Air Deflector (4) - Install.
32.
.png)
Front Compartment Splash Shield (4) - Install.
33. Tires @ Front - Install.
34.
.png)
Seal Ring (3) - Install NEW [2x].
35. Air Conditioning Compressor and Condenser Hose (2) - Install.
36. Air Conditioning Compressor and Condenser Hose Bolt (1) - Install and tighten19N.m (14 lb ft).
37.
.png)
Install a NEW gasket. (2)
38. Install the 2 charge air cooler inlet air tube bolts (3) to the charge air cooler inlet air tube (1) until they snap to the gasket.
39.
.png)
Charge Air Cooler Inlet Air Tube (1) - Install.
40. Charge Air Cooler Inlet Air Tube Bolt (2) - Install and hand tighten.
41.
.png)
Charge Air Cooler Outlet Air Tube (2) - Install.
42. Lower the vehicle.
43.
.png)
Charge Air Cooler Inlet Air Tube Bolt (1) - Install and tighten22N.m (16 lb ft).
44. Raise the vehicle.
45.
.png)
Charge Air Cooler Inlet Air Tube Bolt (2) - Tighten22N.m (16 lb ft).
46.
.png)
Charge Air Cooler Inlet Air Tube (1) - Connect.
47. Retainer Spring (2) - Engage.
48. Warm Up Three-Way Catalytic Converter - Install.
49. Lower the vehicle.
50.
.png)
Ground Cable (2) - Install.
51. Ground Cable Nut (1) - Install and tighten 9N.m (80 lb in).
52.
.png)
Front Bumper Fascia (1) - Install.
53.
.png)
Radiator Outlet Hose (2) - Connect.
54. Clamp (1) - Install.
55.
.png)
Heater Outlet Hose (6) @ Water Outlet (3) - Connect.
56. Heater Inlet Hose (5) @ Water Outlet (3) - Connect.
57. Radiator Inlet Hose (1) @ Water Outlet (3) - Connect.
58. Clamp (2, 4, 7) - Install [3x].
59.
.png)
Power Brake Booster Vacuum Pipe (1) - Connect.
60. Transmission Fluid - Fill.
61.
.png)
Range Selector Lever Cable (1) @ Transmission Range Selector Lever Cable Bracket (2) - Install.
Push the range selector lever cable into the bracket.
62. Range Selector Lever Cable (1) @ Range Selector Lever Cable Lever (4) - Install - Use a suitable tool.
63.
.png)
Charge Air Cooler Outlet Air Tube (3) - Connect.
64. Retainer Spring (2) - Install.
65. Charge Air Cooler Outlet Air Tube Fastener (1) - Install and tighten 22N.m (16 lb ft).
66.
.png)
Electrical Connector (1) @ Intake Air Pressure and Temperature Sensor (2) - Connect.
67.
.png)
Remove the EN-6015 plugs from all connections.
68. Evaporative Emission Front Pipe (2) @ Evaporative Emission Canister Purge Solenoid Valve (1).
69. Fuel Feed Front Pipe - Install.
70.
.png)
Engine Coolant Air Bleed Hose (3) - Install.
71.
.png)
Air Cleaner Assembly (1) - Install.
72.
.png)
NOTE: The Positive Crankcase Ventilation (PCV) tube has a tamper-proof fitting and cannot be disconnected without damage to the PCV tube. Only disconnect the PCV tube if replacing the air cleaner outlet duct. If repositioning the air cleaner outlet duct, leave the PCV tube connected.
Air Cleaner Outlet Duct (3) - Install - Air Cleaner Outlet Duct Replacement.
73.
.png)
Connect the electrical connector. (1)
74.
.png)
Ground Cable Bolt (1) - Install and tighten9N.m (80 lb in).
75.
.png)
Electrical Connector (3) - Install.
76. Wiring Harness Retainer (1, 4, 5) - Install [4x].
77. Ground Cable Nut (2) - Install and tighten 9N.m (80 lb in).
78. Engine Wiring Harness Junction Block - Install.
79.
.png)
Install the battery tray. (2) Battery Tray Replacement.
80.
.png)
Install the battery. (2) Battery Replacement (2.0L LTG).
81.
.png)
Connect the electrical connector. (5)
82. Wiring Harness Retainer (3) - Install.
83. Battery Hold Down Retainer (6) - Install.
84. Battery Hold Down Bolt (2, 4) - Install and tighten [2x] 9N.m (80 lb in).
85. Battery Hold Down Retainer Nut (1) - Install and tighten 9N.m (80 lb in).
86.
.png)
Battery Positive Cable Nut (1) - Install and tighten16N.m (12 lb ft).
87. Retainer (2) - Install.
88.
.png)
Battery Distribution Fuse Block Cover (1) - Install.
89. Retaining Tab (2) - Install [2x].
90. Recharge the refrigerant.
91. Coolant - Fill.
92. Engine Oil - Fill.
93. Upper Intermediate Steering Shaft - Install.
94. Perform the crankshaft position variation learn.
READ NEXT:
 Engine Oil and Oil Filter Replacement
Removal Procedure
1. Raise and support the vehicle.
2. Place a drain pan under the vehicle.
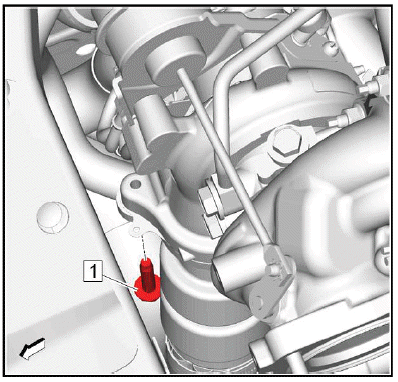
3.
Oil Pan Drain Plug (1) - Remove.
4. Oil Pan Drain Plug Seal (2) - Remove and DISCARD.
5. Drain the e
Draining Fluids and Oil Filter Removal
1.
Remove the oil filter (1). Remove the oil pan drain plug and allow the oil to
drain out.
2. Clean the oil filter housing in the engine block.
CAUTION: Refer to Fastener Caution.
3. Install the o
SEE MORE:
Headlamp Leveling Malfunction (Automatic)
Diagnostic Instructions
Perform the Diagnostic System Check - Vehicle prior to using this
diagnostic procedure.
Review Strategy Based Diagnosis for an overview of the diagnostic
approach.
Diagnostic Procedure Instructions provides an overview of each
diagnostic category.
Diagnostic Fault
When Should an Airbag
Inflate?
This vehicle is equipped with
airbags.
Airbags are designed to inflate if the
impact exceeds the specific airbag
system's deployment threshold.
Deployment thresholds are used to
predict how severe a crash is likely
to be in time for the airbags to
inflate and help restrain the
occupants. The vehic
