Buick Regal: Thread Inserts
General Purpose Thread Repair Kits.
These kits are available commercially.
Repair Procedure
1.
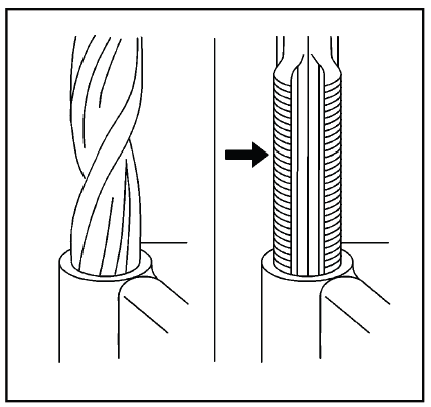
WARNING: Refer to Safety Glasses Warning.
NOTE: Refer to the thread repair kit manufacturer's instructions regarding the size of the drill and tap to use.
Avoid any buildup of chips. Back out the tap every few turns and remove the chips.
Determine the size, the pitch, and the depth of the damaged thread. If necessary, adjust the stop collars on the cutting tool and tap to the required depth.
2. Drill out the damaged threads. Clean out any chips.
3. Lubricate the tap with light engine oil. Tap the hole. Clean the threads.
4.
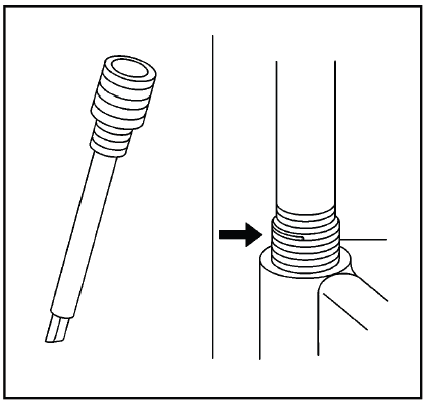
Thread the thread insert onto the mandrel of the installer. Engage the tang of the insert onto the end of the mandrel.
NOTE: The insert should be flush to one turn below the surface.
5. Lubricate the insert with light engine oil, except when installing in aluminum and install the insert.
6. If the tang of the insert does not break off when backing out the installer, break the tang off with a drift.
REGISTERED AND NON-REGISTERED TRADEMARKS
Listed below are Registered Trademarks (Â) or Non-Registered Trademarks () which may appear in this service manual.

READ NEXT:
 Instrument Panel Compartment Door Lock Cylinder Coding
The internal lock cylinder only uses 4 of the 8 cut positions, 5 - 8. The
tumbler positions are on both
sides, are not self-retaining, and are not snap in.
1.
NOTE: All lock cylinders for side mille
Lock Cylinder Coding - Ignition
The ignition lock cylinder uses 8 key cut positions, 1 - 8. The ignition
cylinder tumblers (3) are located
on alternate sides of the cylinder (5). They are not snap-in and are not
self-retaining. I
Repair Instructions
VOLATILE MEMORY PROGRAMMING
Electric Window Lifters
Move all the windows to the topmost position and hold the switch pressed down
for 2 seconds.
Sliding Sunroof
Move the sliding roof to the respectiv
SEE MORE:
Firing Order and Cylinder Identification
NOTE: This information is intended as a quick reference for firing
order and
cylinder identification only. The information provided covers many
vehicles and may include some information that does not apply to the
vehicle you have currently selected.
3 CYLINDER ENGINE
4 CYLINDER ENGINE
5 CYLINDER
DTC B094B or B094C
Diagnostic Instructions
Perform the Diagnostic System Check prior to using this diagnostic
procedure: Diagnostic
System Check - Vehicle
Review the description of Strategy Based Diagnosis: Strategy Based
Diagnosis
An overview of each diagnostic category can be found here: Diagnostic
Proced
