Buick Regal: Input Speed Sensor Replacement
Removal Procedure
1. Control Valve Body - Remove - Refer to Control Valve Body Replacement.
2.
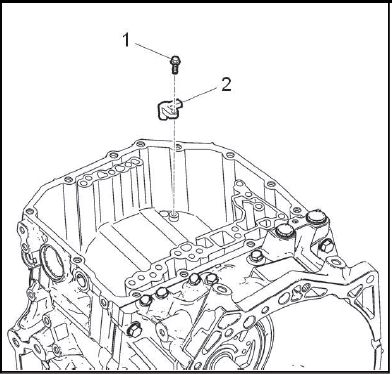
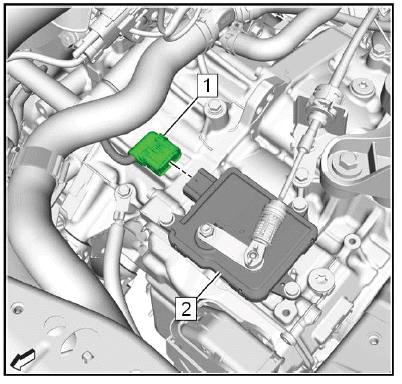
Input Speed Sensor Bolt (1) - Remove.
3. Input Speed Sensor (2) - Remove.
Installation Procedure
1.
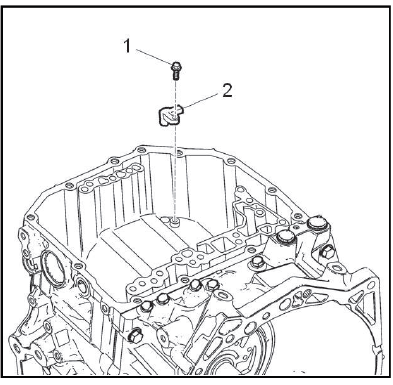
Input Speed Sensor (2) - Install.
CAUTION: Refer to Fastener Caution.
2. Input Speed Sensor Bolt (1) - Install and tighten5N.m (44 lb in).
3. Control Valve Body - Install - Refer to Control Valve Body Replacement.
4. Reset the learned values of the transmission control module. Learned Values Reset.
5. Learn the gear selector neutral position. Gear Selector -N- Position Learn.
TRANSMISSION MOUNT REPLACEMENT
Special Tools
EN-45059 Angle Meter
Equivalent regional tools: Refer to Special Tools
Removal Procedure
1. Battery Tray - Remove - Refer to Battery Tray Replacement.
2. Charge Air Cooler Outlet Air Tube@Engine - Remove Charge Air Cooler Outlet Air Tube Replacement.
3.
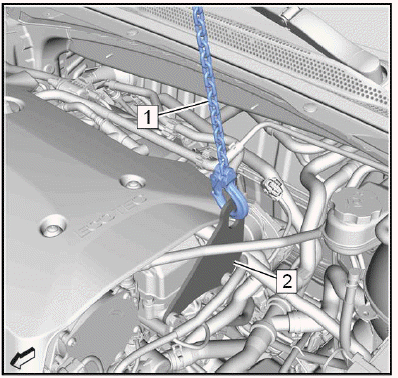
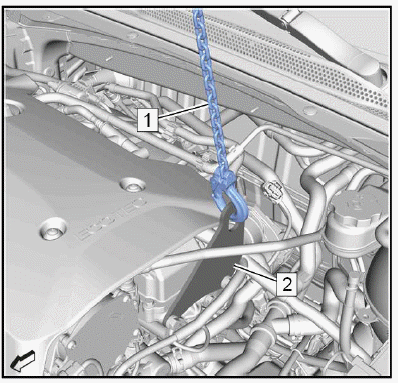
Install the engine lifter (1) to the engine lift bracket (2) and apply tension to the chain.
4.

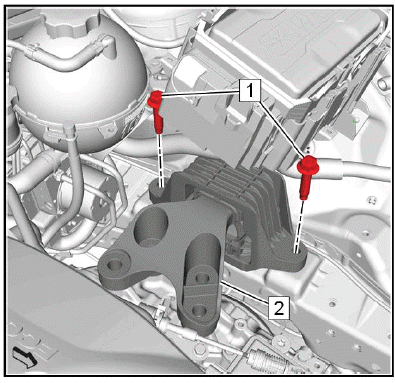
Unclip the wiring harness clip (1) from the transmission mount brace.
5. Remove the transmission mount brace to body bolt (2).
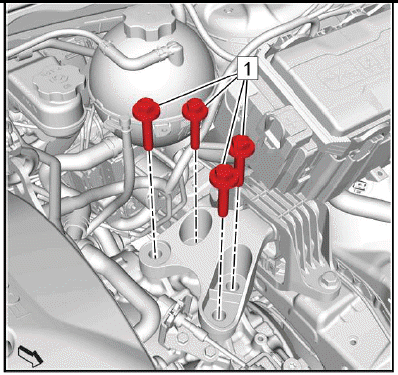
6.
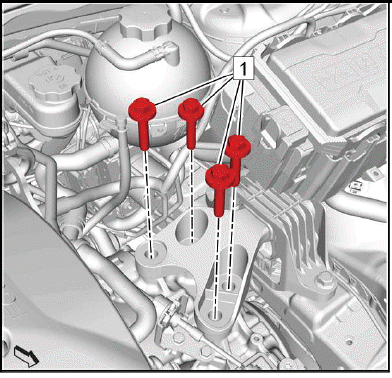
Remove and DISCARD the 4 transmission mount to transmission bolts (1).
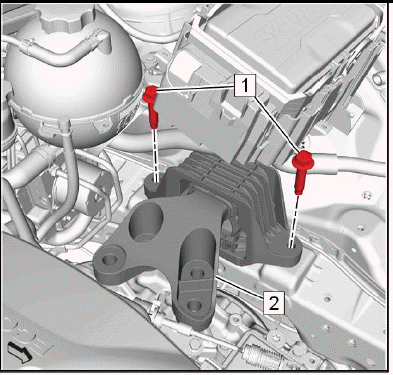
7.
Remove the 2 transmission mount to body bolts (1).
8. Transmission Mount (2) - Remove.
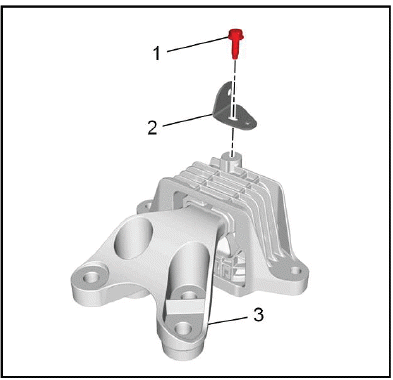
9.

Remove the transmission mount brace to transmission mount bolt (1).
10. Remove the transmission mount brace (2) from the transmission mount (3).
Installation Procedure
1.
Install the transmission mount brace (2) to the transmission mount (3).
2. Install the transmission mount brace to transmission mount bolt (1) and hand tighten so that the transmission mount brace is still movable.
3.
Transmission Mount (2) - Install.
CAUTION: Refer to Fastener Caution.
4. Install the 2 transmission mount to body bolts (1) and tighten to 100N.m (74 lb ft).
5.

Install the transmission mount brace to body bolt (2) and tighten to 22N.m (16 lb ft).
6. Tighten the transmission mount brace to transmission mount bolt to 22N.m (16 lb ft).
7. Clip the wiring harness clip (1) into the transmission mount brace.
8.
CAUTION: Refer to Torque-to-Yield Fastener Caution.
Install 4 NEW transmission mount to transmission bolts (1) and tighten a first pass to 100N.m (74 lb ft).
9. Tighten the 4 NEW transmission mount to transmission bolts a final pass to an additional 60 - 75 degrees, using the EN-45059 meter.
10.
Remove the engine lifter (1) from the engine lift bracket (2).
11. Charge Air Cooler Outlet Air Tube@Engine - Install Charge Air Cooler Outlet Air Tube Replacement.
12. Battery Tray - Install - Refer to Battery Tray Replacement.
TRANSMISSION CONTROL MODULE REPLACEMENT
Removal Procedure
1. Set the parking brake.
2. Shift the transmission control into Neutral position.
3. Remove the battery tray. Battery Tray Replacement.
4.
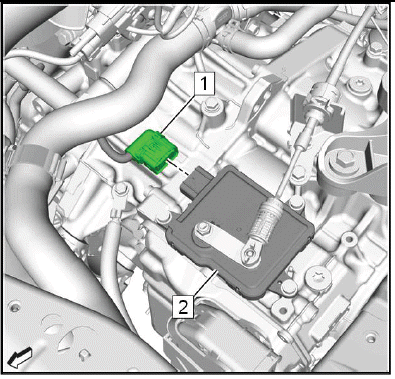
Electrical Connector (1) @Transmission Control Module (2) - Disconnect.
5. Range Selector Lever Cable@Range Selector Lever Cable Lever & Transmission Range Selector Lever Cable Bracket - Remove - Refer to Range Selector Lever Cable Replacement.
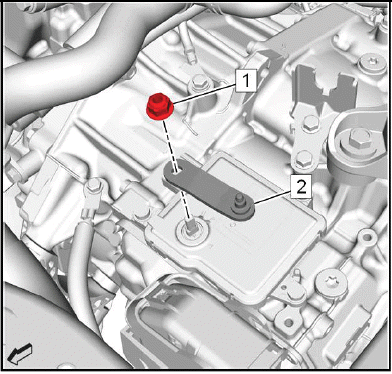
6.

WARNING: Hold the transmission range selector lever while removing or installing the lever retaining nut. Failure to hold the lever can cause damage to the transmission internal park system components which could allow the vehicle to roll when placed in the park position.
Transmission Range Selector Lever Nut (1) & Range Selector Lever Cable Lever (2) - Remove.
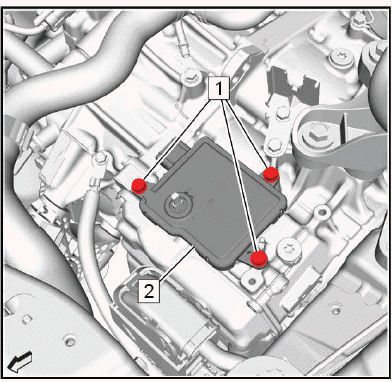
7.

Transmission Control Module Bolt (1) - Remove[3x].
8. Transmission Control Module (2) - Remove.
Installation Procedure
1. Ensure that the transmission manual shaft is in Neutral position.
2.
NOTE: Align the flats on the transmission shift shaft with the flats on the transmission control module.
Transmission Control Module (2) - Install.
CAUTION: Refer to Fastener Caution.
3. Transmission Control Module Bolt (1) - Install and tighten[3x]25N.m (18 lb ft).
4.
Range Selector Lever Cable Lever (2) - Install.
WARNING: Hold the transmission range selector lever while removing or installing the lever retaining nut. Failure to hold the lever can cause damage to the transmission internal park system components which could allow the vehicle to roll when placed in the park position.
5. Transmission Range Selector Lever Nut (1) - Install and tighten22N.m (16 lb ft).
6. Range Selector Lever Cable@Transmission Range Selector Lever Cable Bracket & Range Selector Lever Cable Lever - Install - Refer to Range Selector Lever Cable Replacement.
7.
Electrical Connector (1) @Transmission Control Module (2) - Connect.
8. Install the battery tray.
9. Run all necessary programming and setup procedures.
READ NEXT:
 Front Wheel Drive Shaft Seal Replacement - Left Side
Special Tools
DT-446 Seal Installer
EN-45000 Seal Remover
Equivalent regional tools: Refer to Special Tools
Removal Procedure
1. Raise and support the vehicle.
2. Front Wheel Drive Half Shaft- Le
Wiring Harness Wire Replacement
Removal Procedure
1. Transmission Control Module - Remove - Refer to Transmission Control
Module Replacement.
2. Drain the transmission fluid. Transmission Fluid Drain and Fill.
3. Control Valve Bo
SEE MORE:
Lock Cylinder Coding - Ignition
The ignition lock cylinder uses 8 key cut positions, 1 - 8. The ignition
cylinder tumblers (3) are located
on alternate sides of the cylinder (5). They are not snap-in and are not
self-retaining. It follows the key
code with the first tumbler being the first depth of the key code, closest to
the
Mirror Adjustment
Interior Mirrors
Adjustment
Adjust the rearview mirror for a clear
view of the area behind your
vehicle.
Automatic Dimming Rearview
Mirror
The mirror automatically dims to
reduce the glare of headlamps from
behind. The dimming feature comes
on when the vehicle is started.
Exterior Mirrors
To adjus
