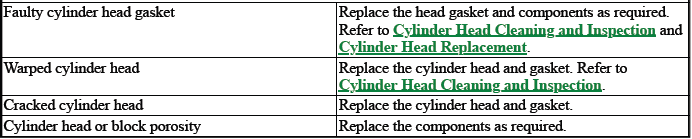
Buick Regal: Coolant in Combustion Chamber
DEFINITION: Excessive white smoke and/or coolant type odor coming from the exhaust pipe may indicate coolant in the combustion chamber. Low coolant levels, an inoperative cooling fan, or a faulty thermostat may lead to an "overtemperature" condition which may cause engine component damage.
NOTE: While not always conclusive, use of hydrocarbon block test kits may reveal hydrocarbons indicating combustion chamber gases in cooling system. It is important to follow the kit instructions. This is not a substitute for service information. Combustion leak tests are available from a wide variety of aftermarket suppliers.
1. A slower than normal cranking speed may indicate coolant entering the combustion chamber. Refer to Engine Will Not Crank - Crankshaft Will Not Rotate.
2. Remove the spark plugs and inspect for spark plugs saturated by coolant or coolant in the cylinder bore.
3. Inspect by performing a cylinder leak-down test. During this test, excessive air bubbles within the coolant may indicate a faulty gasket or damaged component.
4. Inspect by performing a cylinder compression test. Two cylinders "side-by-side" on the engine block, with low compression, may indicate a failed cylinder head gasket. Refer to Engine Compression Test.

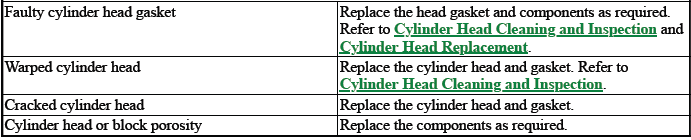
COOLANT IN ENGINE OIL
DEFINITION: Foamy or discolored oil or an engine oil "overfill" condition may indicate coolant entering the engine crankcase. Low coolant levels, an inoperative cooling fan, or a faulty thermostat may lead to an "overtemperature" condition which may cause engine component damage. Contaminated engine oil and oil filter should be changed.
1. Inspect the oil for excessive foaming or an overfill condition. Oil diluted by coolant may not properly lubricate the crankshaft bearings and may lead to component damage. Refer to Lower Engine Noise, Regardless of Engine Speed.
2. Inspect by performing a cylinder leak-down test. During this test, excessive air bubbles within the cooling system may indicate a faulty gasket or damaged component.
3. Inspect by performing a cylinder compression test. Two cylinders "side-by-side" on the engine block with low compression may indicate a failed cylinder head gasket. Refer to Engine Compression Test.
ENGINE COMPRESSION TEST
Special Tools
EN-51749 Compression Gauge Tester Kit
Equivalent regional tools: Special Tools
A compression pressure test of the engine cylinders determines the condition of the piston rings, the valves and the head gaskets.
NOTE: The battery must be at or near full charge.
1. Connect a battery charger to the battery for the duration of the test to maintain an adequate battery level.
2. Engine OFF.
3. Remove the ignition coils and spark plugs from all cylinders. Refer to Spark Plug Replacement.
4. Connect the GDS2 to the vehicle and select "Compression Test". Enabling the Compression Test will disable the fuel pump, fuel injectors, and spark. The throttle body is opened to a Wide Open Throttle (WOT) position.
The GDS2 will also automatically control the cranking procedure for many applications. If cranking control is not available use a remote start switch in place of the Starter Relay to control cranking.
5. Measure the engine compression, using the following procedure:
- Install the EN-51749 adapter into the spark plug hole.
- Install the EN-51749 gauge into the EN-51749 adapter.
NOTE: When the compression measurement is normal, the compression builds up quickly and evenly to the specified compression on each cylinder.
- Enable cranking via the GDS2 or remote start switch. When using a remote start switch, crank the engine for four compression strokes. Record the reading after the cranking cycle completes.
- Repeat the compression test for each cylinder.
6. Compare the compression readings from all of the cylinders.
- The lowest reading should not be less than 70 percent of the highest reading.
- No cylinder should read less than 690 kPa (100 psi).
- For example, if the highest pressure in any 1 cylinder is 1035 kPa (150 psi), the lowest allowable pressure for any other cylinder would be 725 kPa (105 psi). (1035 x 70% = 725) (150 x 70% = 105).
7. The following are indicators of potential problems:
- When low compression is caused by the piston rings, compression is low on the first stroke and tends to build up on the following strokes, but does not reach normal. Compression improves considerably with the addition of oil to the cylinder. Use approximately 3 squirts of oil from a plunger-type oiler into the cylinder and replace the gauge and measure again.
- When low compression is caused by the valves, the measurement is low on the first stroke and does not build up even with the addition of oil.
- Leaking head gaskets will provide the same results as worn valves but engine coolant may be identified in the crankcase. In addition, a leaking head gasket will give low readings on paired cylinders.
8. Disconnect GDS2 diagnostic tool or remote start switch.
9. Install the spark plugs for all cylinders. Refer to Spark Plug Replacement.
10. Install the ignition coils for all cylinders. Refer to Ignition Coil Replacement.
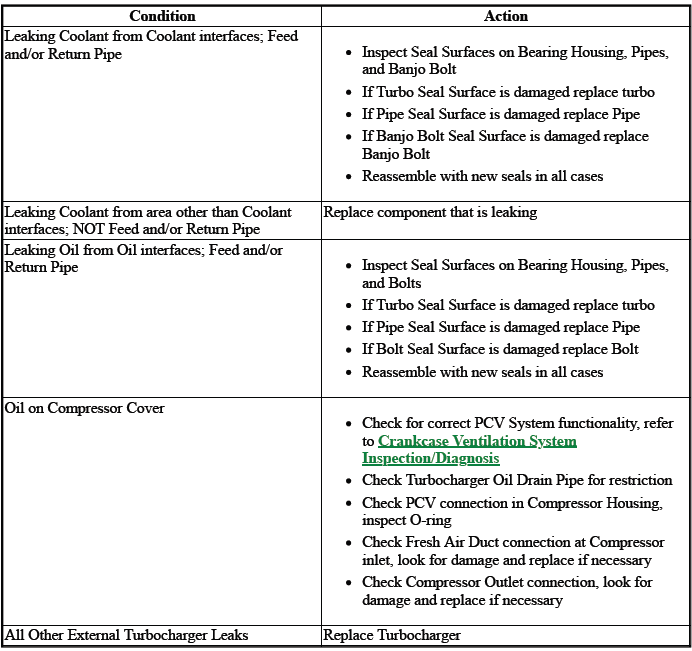
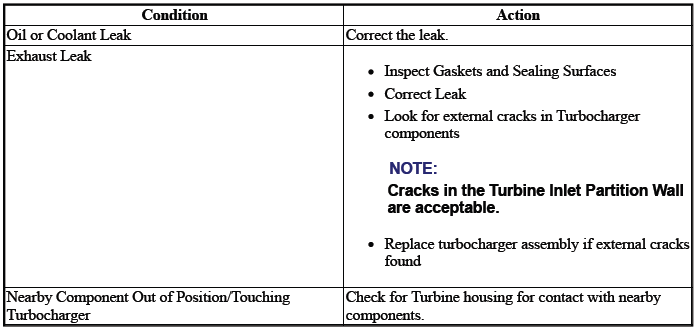
TURBOCHARGER LEAKING FLUIDS EXTERNALLY
TURBOCHARGER NOISE
Some noise is normal. Compare to a known good vehicle.

TURBOCHARGER SMOKE OR SMELL
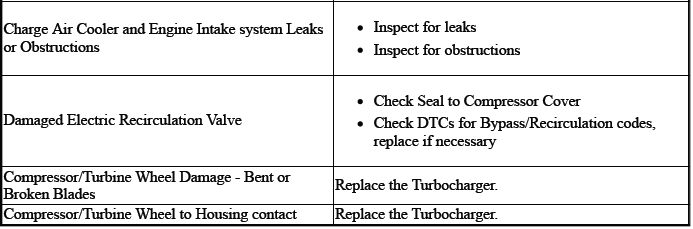
TURBOCHARGER LOSS OF BOOST PRESSURE

READ NEXT:
 Cylinder Leakage Test
Special Tools
EN 35667-A Cylinder Head Leakdown Tester
For equivalent regional tools, refer to Special Tools.
NOTE: A leakage test may be performed in order to measure
cylinder/combustion chamber
lea
Drive Belt Chirping, Squeal, and Whine Diagnosis
Diagnostic Aids
A chirping or squeal noise may be intermittent due to moisture on the
drive belts or the pulleys. It may be
necessary to spray a small amount of water on the drive belts in order
SEE MORE:
Description and Operation
SEAT BELT SYSTEM DESCRIPTION AND OPERATION
Seat Belts
Solid Line - Hard Wire I/O
Dash Line - Serial Data
A11 - Radio
B88D - Seat Belt Switch - Driver
B88P - Seat Belt Switch - Passenger
K36 - Inflatable Restraint Sensing and Diagnostic Module
K85 - Passenger Presence Detection Module
P16 - Instrume
DTC P0480, P0481, P0691, P0692, P0693, or P0694 (LTG)
Diagnostic Instructions
Perform the Diagnostic System Check - Vehicle prior to using this
diagnostic procedure.
Review Strategy Based Diagnosis for an overview of the diagnostic
approach.
Diagnostic Procedure Instructions provides an overview of each
diagnostic category.
DTC Descriptors
D
